1

How to Hack Wifi Via CMD

Rabu, 19 Juni 2013

How to Hack Wifi Via CMD

Blog By :ridho pratama
How to Hack Wifi Via CMD in Windows Gallery, How to Hack Wifi Via CMD in Windows
This article only and not for the Development of Security To use misconstrued.
images
This time I want to share How to Hack Wifi Via CMD in Windows, well the title will certainly attract nih aja our discussion this time, I was actually old enough to know this trick but new thoughts to post.
The hallmark of the hotspot mikrotik generally before when we are faced with a menu browsing can login (enter your username and password). we're here to login bypass, no need to login again when the menu can berbrowsing next time even though the hotspot has been Change username and password.
How to Hack Wireless Password Wifi Or latest. How to find wifi password,  How to Hack or Crack Wifi Password, hack crack passwords will be based on WEP encryption. So people tighten your belt for a new hack and let us begin to hack wifi.
This way I do because I am so angry at my friends who both use wifi because often use netcut. My annoyance prompted me to look for other ways cowering behind them, and the results are very Manteb, in use for youtube streaming not use buffering (* depending on the quality of wifi). Okay from the increasingly curious mending immediately wrote to the very thing in waiting, check it out.
Follow these steps without lacking any:
  • Go to RUN ( CTRL+R ) and then type cmd.exe, or can also directly type cmd.exe in the search field in the start menu (* for those who use Windows 7).

 hackwirelessviacmd
Then it will appear like this.
 cmd1
  • Then Typing ipconfig / all in the blink pointer. This command serves to display information about the connection where you are now.

cmd2
  • The result will be as below. containing all sorts of information about your computer. Then find the name DNS server then see the code in the next, and the code that you must remember, and if necessary write first in notepad or WordPad.

 hasilperintahcmd
Then, scrolling cmd.exe you miss the bottom, then you will find the command as an initial order for the type. Now the command Press different again. Type the following command ping 10.0.1.2 -L 500 -T. and the code came from 10.0.1.2 DNS Servers listed above (* Got my DNS Server). Replace with the DNS Server you.
 tampilancommadpromt3
  • Press Enter. Then it will look like the below. Let the process continues as long as you're online using wifi where where you're hanging out today. When you need to minimize it, just do cmd.exe closed.

  tampilancommadpromt4
These tips aim to suck bandwitch being used by other people in one network hotspot / wifi equally guys use. If you are not satisfied with the speed can be changed 500 to 1000 or 2000. But I suggest do not overdo the pity of others. and in addition the method is valid only in windows linux it if I had not tried. Cool is not ... !!
0

Cara Membuat Aplikasi Client Server dengan Visual Basic 6 & MYSQL

Jumat, 14 Juni 2013

Cara Membuat Aplikasi Client Server dengan Visual Basic 6 & MYSQL

Cara Membuat Aplikasi Client Server dengan Visual Basic 6 & MYSQL
Pada tutorial ini anda akan belajar bagaimana membuat aplikasi client server menggunakan visual basic & MYSQL Untuk lebih memperjelas pemahaman anda akan digunakan studi kasus program KASIR. Dimana pada implemantasinya nanti, aplikasi yang dibuat akan terpisah dengan database. Database akan ditempatkan pada sebuah server dan aplikasi dapat ditempatkan pada beberapa komputer client. Untuk pengembangan / pembuatan aplikasinya sendiri dapat dilakukan di komputer lokal terlebih dahulu. Adapun yang anda perlukan pada tutorial ini, yaitu visual basic, MYSQL, dan Mysql Connector-ODBC. MYSQL dan MYSQL Connector ODBC dapat anda download di www.mysql.com. MYSQL Connector ODBC dibutuhkan agar dapat melakukan koneksi database MYSQL dari VB

Setelahnya semuanya terinstall mulailah membuat database MYSQL beserta tabel - tabelnya. Buatlah sebuah database dengan nama kasir, dan buat 5 tabel seperti di bawah:

Tabel user_login

Field Tipe Data
user_login_id varchar(50) *
user_name varchar(100)
user_psw varchar(20)

Tabel product

Field Tipe Data
product_id varchar(40) *
product_name varchar(100)
price double
stock integer

Tabel transaksi

Fields Tipe Data
no_transaksi integer (auto increment) *
tgl_transaksi datetime
total_barang integer
total_harga double
kasir varchar(50)

Tabel detail_transaksi

Fields Tipe Data
no_transaksi integer
product_id varchar(40)
jumlah integer
harga_satuan double

Tabel transaksi_temp

Fields Tipe Data
no_transaksi integer
product_id varchar(40)
jumlah integer
harga_satuan double

* Primary Key
Tabel user_login digunakan untuk menyimpan data pengguna aplikasi, tabel product digunakan untuk menyimpan data product yang dijual. Tabel transaksi untuk menyimpan data transaksi dan tabel detail_transaksi untuk menyimpan detail dari transaksi yang dilakukan. Sedangkan tabel traksaksi_temp digunakan untuk mencatat secara sementara detail traksaksi yang dilakukan, setelah transaksi selesai dilakukan baru dipindahkan ke tabel transaksi.

Setelah database dan kasir selesai dibuat tambahkan data (insert data) pada tabel user dengan data berikut:
user_login_id user_name user_psw
admin Administrator admin
langkah selanjutnya adalah mempersiapkan koneksi ke database. Ikutilah langkah-langkah di bawah ini.
  1. Buka control panel, double klik pada Administrative Tools, kemudian double klik pada Data Sources (ODBC). Dan akan muncul window kurang lebih seperti berikut:
    Data Sources (ODBC)
  2. Klik pada System DSN, dan klik tombol Add, dan akan muncul window seperti berikut:
    System DNS
  3. Pilih MySQL ODBC 3.5.1 Driver, dan klik tombol Finish, dan akan tampil window berikut :
    Connector / ODBC
  4. Kemudian isi form di atas dengan data seperti berikut:
    Connector-ODBC
  5. Klik tombol Test, jika muncul kotak dialog yang menyatakan sukses, tekan OK dan tekan OK sekali lagi.
Setelah selesai sekarang anda telah siap untuk membuat Aplikasi KASIR..

Membuat Form Utama Administrator dan Form Login

Buka microsoft visual basic anda dan buat Standar EXE project. Setelah project dibuat akan langsung terbentuk sebuah form. Tambahkan label dan tombol serta atur propertiesnya seperti berikut 

Admin Form
Komponent Properties
Form1 Name : main_form
Caption : Administration
Label1 Caption : Welcome,
Label2 Name : label_user
Caption : User
Command1 Name : btn_user
Caption : User
Command2 Name : btn_product
Caption : Product
Command3 Name : btn_trans
Caption : Transaksi
Command4 Name : btn_report
Caption : Report

Setelah diatur propertinya maka hasilnya adalah seperti berikut:

Admin Form
Admin Form

Kemudian Buat Form baru dengan cara, klik Menu Project, Add Form. Akan tampil window Add Form dan pilih Log In Dialog serta klik tombol open. Hasilnya seperti di bawah:

Login Form
Form Login

Sekarang buka notepad dan ketik kode di bawah:

[Data]
DB=kasir
SERVER=localhost
Uid=root
Password=root

Kemudian simpan di direktori c:\windows dengan nama koneksi.ini, file koneksi.ini berfungsi untuk menyimpan data yang diperlukan untuk koneksi ke database. Pada bagian DB berisi nama database yang akan digunakan, SERVER berisi IP address Server tempat database disimpan (untuk sementara gunakan lokalhost). Uid berisi database user name dan Password adalah password database.

Sekarang Kembali ke Editor Visual Studio. Pilih Menu Project, Add Module untuk membuat module. Pada window Add Module klik Open. Download File berikut ini, kemudian copy dan paste isi file tersebut pada module yang sedang dibuat. Setelah selesai simpan module tersebut. Kemudian Klik menu Project, References dan akan muncul window project reference. Centang pada bagian Micosoft ActiveX Data Objects 2.0 Library dan tekan tombol OK.

Sekarang beralih ke form login, double click pada tombol OK, Hapus script yang telah ada dan ganti dengan script di bawah:
Private Sub cmdOK_Click()
Call Koneksi
Dim RS As ADODB.Recordset
Set RS = New ADODB.Recordset
Dim SQL As String
'query untuk login
SQL = "select * from user_login where user_login_id='" & txtUserName.Text & "'"
'membuka koneksi ke databse
RS.CursorLocation = adUseClient
RS.Open SQL, conn, adOpenDynamic, adLockOptimistic
'cek kebenaran user_login_id
If (RS.RecordCount > 0) Then
'cek kebenaran password
If (RS!user_psw = txtPassword.Text) Then
user_login_id = txtUserName.Text
user_name = RS!user_name
Load main_form
main_form.Show
Unload Me
Else
MsgBox "Maaf Password Salah"
End If
Else
MsgBox "Maaf User Name Salah"
End If
End Sub
Kemudian double click pada tombol Cancel, hapus script yang telah ada dan ganti dengan script berikut:
Private Sub cmdCancel_Click()
Dim pil As VbMsgBoxResult
pil = MsgBox("Anda Yakin untuk keluar?", vbQuestion + vbYesNo, "Exit")
If (pil = vbYes) Then Unload Me
End Sub
Setelah selesai pilih menu Project, properties. Pada window Project Properties di bagian Startup Object pilih frmLogin. Kemudian tekan tombol OK.
Sekarang beralih ke admin_form, double click pada form dan ketik script berikut :
Private Sub Form_Load()
label_user.Caption = user_name
End Sub
Setelah selesai simpan project anda dengan nama kasir dan coba untuk menjalankanya dengan menekan tombol F5 pada keybord.

Pada tutorial Membuat Aplikasi Client Server dengan VB & MYSQL ini anda telah belajar bagimana menginstall MySQL connector ODBC, melakukan koneksi ke database MySQL dengan ADODB, serta membuat system login.  Pada tutorial selanjutnya akan dijelaskan Proses membaca data dari tabel, menampilkan data, menambahkan data ke tabel, mengedit record pada tabel dan menghapus record.
 
 
source: myphptutorials.com
 

UPDATE 17 June 2013

 
quote :
 
" Databasenya mau pakai apa,
Database Server(sql server,mysql) atau database File (Ms. Access) 
misal database yang dipakai SQL Server :

* pertama database server harus terinstall terlebih dahulu di salah satu komputer
* jika sudah berarti program di tiap-tiap client harus merujuk ke database yg sql servernya terinstall, agar data yang di olah bisa sama untuk seluruh client.
* dan... di masing-masing client untuk bisa masuk ke database server harus mengisi login dari server terserbut
misal:
computer name = server
user database = sa
password database = ***
database = dbinventory

* dan... agar program di client bisa jalan, component-component yang diperlukan harus sudah terinstall (teregistrasi) di client tersebut "
 
" kalau databasenya ms access database tersebut tempatkan di computer server terus folder dimana database tersebut berada harus di Share (supaya komputer client bisa memanggil) 

dan untuk koneksinya (menambahkan code diatas): 

 
Dim con As ADODB.Connection
 
Dim pathDb As String

pathDb = "\\compServer\dbStok.mdb"

con.ConnectionString = "Provider=Microsoft.Jet.OLEDB.4.0;Data Source=" & pathDb & ";Persist Security Info=False"

 
con.Open
"
 

Creating Client/Server Application using Winsock

 
Sample Image - client.jpg

INTRODUCTION

Most of you might have worked with Internet Transfer Control which is very handy control when it comes to Internet Programming but there is another control which even more robust and helps programmers creating more flexible applications. Winsock control comes with VB6 and is used to create applications that access the low-level functions of the Transmission Control Protocol/Internet Protocol (TCP/IP).

TCP/IP is a specification that defines a series of protocols used to standardize how computers exchange information with each other. TCP/IP provides communication across interconnected networks that use diverse hardware architectures and various operating systems. The protocols in TCP/IP are arranged in a series of layers known as a protocol stack. Each layer has its own functionality. 
Winsock is a standard that is maintained by Microsoft. This standard is basically a set of routines that describe communications to and from the TCP/IP stack. These routines reside in a dynamic link library that runs under Windows. The winsock DLL is interfaced with TCP/IP and from there through the Internet.
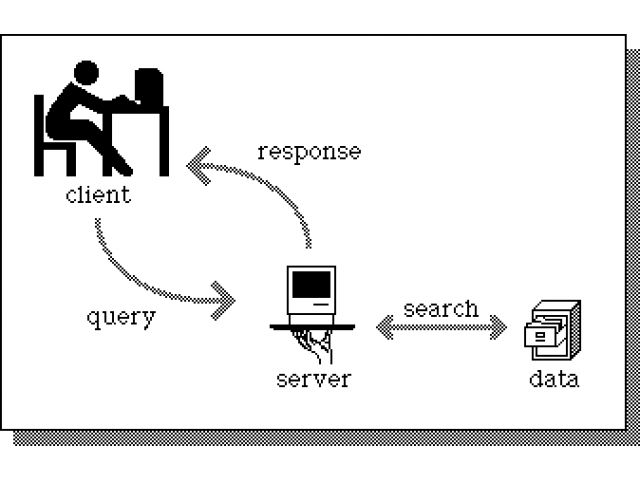
In this article, I am going to show how to use the winsock in a client server environment, we will create two separate applications, one of which will be a server and the other will be a client. Both client and server will interact with each other to exchange data. Client will send a request to the server and the server which will be connected to a database will retrieve the information requested by the client from the database and will return the requested information back to the client. You will a database with this article, the database contains the item numbers and their prices. In real life situations, database might be located on a machine different from the one that hosts the client application.

I think it would be better to talk about the ports before we proceed any further. A port is a special memory location that exists when two computers are in communication via TCP/IP. Applications use a port number as an identifier to other computers, both the sending and receiving computers use this port to exchange data.

To make the job of communication easier, some port numbers have been standardized. These standard port numbers have no inherent value other than that users have agreed to use them with certain applications. Table below lists a number of popular and publicly accepted port numbers and their corresponding applications.
 
Service
Port
HTTP 80
FTP 20,21
GOPHER 70
SMTP 25
POP3 110
TELNET 23
FINGER 79
LOCAL LOOPS/CALLBACKS 0

Using the Winsock Control

Winsock is above the TCP/IP protocol stack in the ISO/OSI model. TCP/IP is an industry standard communication protocol that defines methods for packaging data into packets for transmission between computing devices on a heterogeneous network. TCP/IP is the standard for data transmission over networks, including the Internet. TCP establishes a connection for data transmission and IP defines the method for sending data packets.
The Microsoft Winsock control makes using the TCP/IP a breeze. Microsoft has wrapped up the Winsock and INetAPI API calls into a nice neat package that you can easily incorporate into your Visual Basic applications.

Winsock Operating Modes

The Transport layer (also known as the Host-to-Host Transport layer) is responsible for providing the Application layer with session and datagram communication services. The core protocols of the Transport layer are TCP and User Datagram Protocol (UDP). The Winsock control supports the following two operating modes:
 
  • sckTCPProtocol
  • sckUDPProtocol

Winsock Properties

Winsock enables you to create clients and servers using the same control. This dual functionality enables you to specify through property setting the type of application you will be building. The Winsock control uses a number of the same properties, whether you are creating client or a server, thereby all but eliminating the learning curve needed to create applications. Some of the important properties of the control are as following:
BytesReceived Property

This property returns the number of bytes currently in the receive buffer. This is a read-only property and is unavailable at design time. The value returned is a long integer.

LocalHostName Property

The LocalHostName property returns the name of the local host system. This is read-only property and is unavailable at the design time. The value returned is a string.

LocalIP Property

The LocalIP property returns the local host system IP address in the form of a string, such as 11.0.0.127. This property is read-only and is unavailable at design time.

LocalPort Property

This property returns or sets the local port number. This can be both read from and written to and is available at both design time and runtime. The value returned is a long integer.

Protocol Property

Returns or sets the protocol, either TCP or UDP, used by the Winsock control.

RemoteHost Property

The RemoteHost property returns or sets the remote host. This can be both read from and written to and is available both in design time and runtime. The value returned is a string and can be specified either as an IP address or as a DNS name.

RemotePort Property

This property returns or sets the remote port number.

State Property

This returns the state of the control as expressed by an enumerated list. This is read-only property and is unavailable at design time.

Winsock Methods

Some of the important methods of Winsock control are as following:

Accept Method

It accepts the request for connection from the client system. For this method to be used, the control must be in the listening state.

Close Method

The Close method terminates a TCP connection from either the client or server applications.

GetData Method

GetData is the method that retrieves the current block of data from the buffer and then stores it in a variable of the variant type.

PeekData Method

The PeekData method operates in a fashion similar to the GetData method. However, it does not remove data from the input queue.

Listen Method

This is invoked on the server application to have the server application wait for a TCP request for connection from a client system.

SendData Method

This method dispatches data to the remote computer. It is used for both the client and server systems.

Connect Method

The Connect method requests a connection to a remote computer.

I am not going to discuss events here. You can find the complete details of events on the Microsoft site (http://www.microsoft.com).

In the sample provided with this article, we are going to create two applications, one server and client. This is a real world example, where the clients requests some information from the server and the server retrieves some specific information from the database and sends the retrieved information back to the client. The database used in the sample is also provided with the code. The database name is Prices.mdb. This is a small database comprising of a single table containing two fields. The fields are item number and price. The clients sends the item number to the server and the server retrieves the price against that item number from the database and sends it back to the client. One of the current trends in software development today is the issue of thick clients versus thin clients. A thick client is basically an application that performs the bulk of the processing on the individual client PC, whereas a thin client performs the processing on the server. 

Creating the Client

Follow the steps shown below:

1. Start a new EXE project.
2. Add a Winsock control to your application.
3. Add all the controls to the form (See the application for details).

Here is the complete code:
   Option Explicit Private Sub cmdClose_Click() Winsock1.Close shpGo.Visible = False shpWait.Visible = False shpError.Visible = True End Sub Private Sub cmdConnect_Click() Winsock1.RemoteHost = "11.0.0.1" 'Change this to your host ip Winsock1.RemotePort = 1007 Winsock1.Connect shpGo.Visible = True txtItem.SetFocus End Sub Private Sub cmdSend_Click() If Winsock1.State = sckConnected Then Winsock1.SendData txtItem.Text shpGo.Visible = True Label3.Caption = "Sending Data" Else shpGo.Visible = False shpWait.Visible = False shpError.Visible = True Label3.Caption = "Not currently connected to host" End If End Sub Private Sub Winsock1_DataArrival(ByVal bytesTotal As Long) Dim sData As String Winsock1.GetData sData, vbString 'Label1.Caption = sData txtPrice.Text = sData Label3.Caption = "Received Data" shpGo.Visible = True shpWait.Visible = False shpError.Visible = False End Sub Private Sub Winsock1_SendComplete() Label3.Caption = "Completed Data Transmission" End Sub 

Creating the Server

The server portion of the price lookup example is designed to accept the item number sent from the client and look up the associated price in a database. The server than sends the information back to the client. There is file named as �path.txt� in the folder called as �server�. Locate that file and change the database path in the file to the location where the database is located on your machine. The connection to the database is made in the DataArrival event of the Winsock control. The following code segment opens the database and finds the first occurrence of the value in sItemData. When the record is found, the value contained in the price field is sent back to the client.
   ' Get clients request from database strData = "Item = '" & sItemData & "'" rs.Open "select * from prices", strConnect, adOpenKeyset,adLockOptimistic rs.Find strData strOutData = rs.Fields("Price")  
Follow the steps shown below to create the server:
1. Start a new Standard EXE in VB.
2. Add the Winsock control to your application.
3. Add the controls to the form as shown in the accompanying code (See the folder named as �server�).

Here is the complete code:
   Option Explicit Dim iSockets As Integer Dim sServerMsg As String Dim sRequestID As String Private Sub Form_Load() Form1.Show lblHostID.Caption = Socket(0).LocalHostName lblAddress.Caption = Socket(0).LocalIP Socket(0).LocalPort = 1007 sServerMsg = "Listening to port: " & Socket(0).LocalPort List1.AddItem (sServerMsg) Socket(0).Listen End Sub Private Sub socket_Close(Index As Integer) sServerMsg = "Connection closed: " & Socket(Index).RemoteHostIP List1.AddItem (sServerMsg) Socket(Index).Close Unload Socket(Index) iSockets = iSockets - 1 lblConnections.Caption = iSockets End Sub Private Sub socket_ConnectionRequest(Index As Integer, ByVal requestID As Long) sServerMsg = "Connection request id " & requestID & " from " & Socket(Index).RemoteHostIP If Index = 0 Then List1.AddItem (sServerMsg) sRequestID = requestID iSockets = iSockets + 1 lblConnections.Caption = iSockets Load Socket(iSockets) Socket(iSockets).LocalPort = 1007 Socket(iSockets).Accept requestID End If End Sub Private Sub socket_DataArrival(Index As Integer, ByVal bytesTotal As Long) Dim sItemData As String Dim strData As String Dim strOutData As String Dim strConnect As String  ' get data from client Socket(Index).GetData sItemData, vbString sServerMsg = "Received: " & sItemData & " from " & Socket(Index).RemoteHostIP & "(" & sRequestID & ")" List1.AddItem (sServerMsg) 'strConnect = "Provider=Microsoft.Jet.OLEDB.4.0;Data Source=G:\Prices.mdb;Persist Security Info=False" Dim strPath As String  'Change the database path in the text file  Dim fso As New FileSystemObject, txtfile, _ fil1 As File, ts As TextStream Set fil1 = fso.GetFile("path.txt") ' Read the contents of the file. Set ts = fil1.OpenAsTextStream(ForReading) strPath = ts.ReadLine ts.Close Set fso = Nothing strConnect = "Provider=Microsoft.Jet.OLEDB.4.0;" & _ "Persist Security Info=False;Data Source=" & strPath & _ "; Mode=Read|Write" Dim rs As New ADODB.Recordset ' Get clients request from database strData = "Item = '" & sItemData & "'" rs.Open "select * from prices", strConnect, adOpenKeyset, adLockOptimistic rs.Find strData strOutData = rs.Fields("Price") 'send data to client sServerMsg = "Sending: " & strOutData & " to " & Socket(Index).RemoteHostIP List1.AddItem (sServerMsg) Socket(Index).SendData strOutData End Sub 

Running the example

1. Create executable for both the applications.
2. Launch both the applications.
3. Click the Connect button.
4. Enter a value from 0 to 6 (currently the database contains only six records, error handling is not done in this code, you can add the error handling yourself) and click the Lookup button. The associated price will be displayed in the price field.
source: codeproject.com


VIDEO HOW TO MAKE a Client/Server Application in VISUAL BASIC 6

www.youtube.com/watch?v=eXUI5ZZ44kE
2

Membuat Aplikasi Chatting Menggunakan Visual basic


Membuat Aplikasi Chatting Menggunakan Visual basic

Pada halaman ini, akan dijelaskan bagaimana cara membuat aplikasi chat sederhana dengan menggunakan Visual Basic.

Langkah Pertama, buka aplikasi visual basic. Maka akan tampil jendela berikut :


Pada jendela ini, silakan pilih icon “Standard EXE” dan klik “Open”. Maka akan tampil jendela seperti berikut :


Selanjutnya, komponen2 yang kita perlukan yaitu :
  1. Label                             
  2. Command Button    
  3. Textbox                       
  4. Winsock                       
Tidak menemukan komponen Winsock?

Ya, komponen ini tidak tersedia secara langsung seperti ketiga komponen di atas. Makanya kita memerlukan penambahan komponen dengan cara pilih Project -> Components… pada menu bar. Maka akan tampil jendela berikut :

Pada jendela ini, cari komponen yang bernama Microsoft Winsock Control 6.0. centang pada bagian kirinya. Klik Apply lalu OK. Maka komponen Winsock akan tampil di halaman utama.

Selanjutnya, komponen sudah siap. Maka kita akan mulai dari tampilannya.

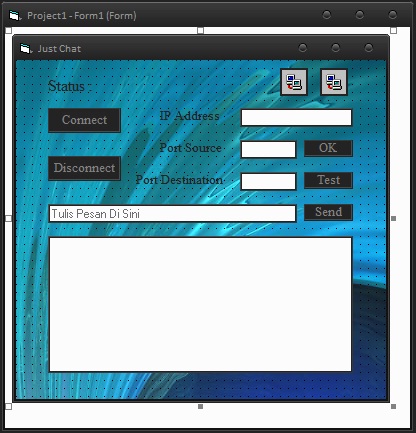
Silahkan buat tampilan seperti berikut :

Tampilan di atas memiliki 4 buah komponen Label, 5 komponen Command Button, 5 komponen Textbox, dan 2 komponen Winsock.

Untuk mempermudah, silahkan ganti nama(name) dari setiap komponen tersebut. Nama tersebut dapat diganti dengan mengklik komponen tersebut dan pada jendela properties akan tampil baris (name).


Jika tampilan selesai, selanjutnya kita menyelesaikan bagian listing programnya.

Berikut Listing dari program tersebut:

Private Sub Connect_Click()
Winsock_client.Connect
End Sub

Private Sub Send_Click()
Winsock_client.SendData Winsock_server.LocalHostName & ” : ” & Text4.Text
Text5.Text = Text5.Text & vbCrLf & Text4.Text
End Sub

Private Sub Disconnect_Click()
Winsock_server.Close
Winsock_client.Close
Label6.Caption = “Disconnected”
Text1.Visible = True
Text2.Visible = True
End Sub

Private Sub Test_Click()
Winsock_server.LocalPort = Text3.Text
Winsock_server.Listen
End Sub

Private Sub OK_Click()
Winsock_client.RemoteHost = Text1.Text
Winsock_client.RemotePort = Text2.Text
End Sub
Private Sub Text1_gotfocus()
Text1.Text = “”
End Sub

Private Sub Text2_gotfocus()
Text2.Text = “”
End Sub
Private Sub Text4_Click()
Text4.Text = “”
End Sub

Private Sub Winsock_client_Connect()
Status.Caption = “Status : Connected”
End Sub
Private Sub winsock_server_ConnectionRequest(ByVal requestID As Long)
Winsock_server.Close
Winsock_server.Accept requestID
End Sub

Private Sub winsock_server_DataArrival(ByVal bytesTotal As Long)
Dim chat As String
Winsock_server.GetData chat
Text5.Text = Winsock_server.LocalHostName & “:” & Text5.Text & vbCrLf & chat
End Sub

Tampilan selesai, listing selesai. Selanjutnya jalankan programnya.

Selamat Mencoba.
0

Game Hacking

Jumat, 07 Juni 2013

Game Hacking

Kali ini saya akan share tentang 4 game belajar hacking, game ini benar-benar keren. Lebih variatif dan didukung oleh grafis yang keren seakan kita menjadi hacker sesungguhnya. Di game ini kita juga terkadang harus meng-hack sistem traffic light, tower cell phone, phreaking dll. Dijamin bagi anda yang suka hacking akan mengenang masa lalu ;-)
Udah tidak sabar? Langsung saja deh saya beri list dari game-game tersebut, ini dia :
1. Hack The Game
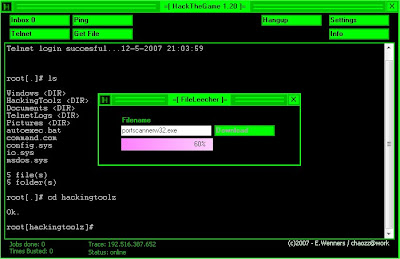
Hack The Game
Game ini merupakan simulasi hacking secara garis besar, jadi tidak seribet klo kita sedang melakukan hacking secara nyata (ya iyalah, kalau lebih ribet mah langsung hacking aja gag usah main game .he.he ). Untuk dapat memainkan game ini diperlukan pengetahuan akan perintah-perintah DOS.
Download Hack The Game: klik disini 
2. HACKER EVOLUTION
HACKER EVOLUTION 
Game ini bernama HACKER EVOLUTION. Dalam game ini, yang kita lakukan adalah mengintip password, melakukan cracking dan jika kita sudah bisa connect ke server target, maka kita bisa melakukan transfer uang. Setelah mendapatkan uang yang cukup banyak, kita bisa meng?upgrade komputer yang kita gunakan. Beberapa keperluan hacking yang bisa diupgrade antara lain Modem. Modem sangat berperan penting di sini. Karena dengan modem yang bagus, kita bisa melakukan proses cracking dan tranfer data dengan lebih cepat. Hal ini bisa mengurangi kemungkinan kegiatan kita terdeteksi oleh pihak target.
HACKER EVOLUTION
Game ini benar-benar menguji skill kita dalam kegiatan hacking. Logika kita benar-benar diuji dalam permainan yang satu ini. Kemahiran kita dalam mengecoh target juga penting karena jika kita bisa mengalihkan perhatian target, aksi kita tidak akan terdeteksi. Satu hal yang menarik di sini adalah kita tidak bisa mengharapkan tampilan yang bagus. Di game ini semuanya berbasis text. Jadi, jika ingin mentransfer sejumlah uang misalnya $2000, kita harus menggunakan perintah transfer 2000. Masih banyak perintah-perintah lain untuk menjalankan aksi kita, misalnya scan, killtrace, config, crack, dan sebagainya.
Tertarik untuk mencoba game yang satu ini ?
Download HACKER EVOLUTION:
klik disini
3. HACKER EVOLUTION UNTOLD HACKER EVOLUTION UNTOLD
Game ini sendiri adalah game simulasi seorang hacker yang mencoba menaklukan jaringan internet dalam beberapa misi, yang unik di HEU adalah kita menggunakan semacam komputer virtual dalam memainkan game yang menggunakan command line sebagai interfacenya. Jadi kita seolah benar-benar meng-hack sebuah jaringan komputer.
Yang menantang di HUE adalah kita dituntut banyak berfikir agar saat kita menjalankan aksi tidak banyak meninggalkan banyak trace, karena bisa-bisa misi gagal jika trace-nya mencapai angka 100%. Biasanya pemain akan menggunakan perintah ?killtrace? untuk mengurangi trace sampai dengan 10%, namun hal ini akan menggurangi uang si pemain sampai dengan 500$.
Download HACKER EVOLUTION:
klik disini
4. UPLINK HACKER ELITE
UPLINK HACKER ELITE
Kejahatan komputer berteknologi tinggi dan spionase industri di Internet tahun 2010. Anda memainkan Agen Uplink yang membuat hidup dengan pekerjaan tepat untuk perusahaan besar. Tugas Anda melibatkan hacking ke dalam sistem komputer saingan, mencuri data penelitian, menyabotase perusahaan lain, pencucian uang, menghapus bukti, atau framing orang yang tidak bersalah.
Anda menggunakan uang yang Anda hasilkan untuk meng-upgrade sistem komputer Anda, dan membeli perangkat lunak baru dan alat. Seperti pengalaman Anda meningkatkan tingkat Anda menemukan lebih berbahaya dan menguntungkan misi menjadi tersedia. Anda dapat berspekulasi pada pasar saham sepenuhnya bekerja (dan bahkan mempengaruhi hasilnya). Anda dapat mengubah masyarakat akademis atau catatan kriminal. Anda dapat mengalihkan uang dari transfer bank ke rekening Anda sendiri. Anda bahkan dapat mengambil bagian dalam pembangunan virus komputer paling mematikan yang pernah dirancang.
Download UPLINK HACKER ELITE :
klik disini
klik disini
Update : klik disini
Sudah dulu ya postigan gamenyaaaa…
2

Cara Hack Wi-Fi/Hotspot


Cara Hack Wi-Fi/Hotspot

Ciri dari hotspot mikrotik biasanya sebelum kita berbrowsing akan dihadapkan dengan menu login (Memasukan username dan password). Kita disini akan mem-bypass loginnya, sehingga tidak membutuhkan menu login lagi jika akan berbrowsing lain waktu walaupun pihak yang punya hotspot sudah mengganti2 username dan passwordnya. 

Kita disini menggunakan software netcut, dengan software ini kita bisa memotong bandwith agar bandwith dialihkan banyak yang masuk ke kita.Caranya:
  1. Download software netcut 2.1.4 (versi terbaru ARCAI). download disini. Dan jika kamu memakai windows 7, setelah install netcut, download winCap disini. (Tujuan dari install netcut untuk melihat MAC address yang terhubung dengan kita).
  2. Coneksikan komputer/laptop kita ke hotspot.
  3. Jalankan netcut nya.
  4. Pilih LAN Card / NIC yang kita gunakan dengan mengklik menu Choice NetCard.
p3k

5. Lalu pindah ke menu utama, dan pilih network orang lain, jangan pilih network kamu maupun network server. 
p3k

6. Pindah dan copy IP address dan MAC address dengan klik print table dan copy ke notepad. 
p3k

7. Paste kan di notepad, kemudian edit nilai MAC address, pada contoh ini [00:26:5E:60:81:1C]. Hilangkan tanda [:] sehingga menjadi 00265E60811C. Nilai ini yang akan kita gunakan untuk merubah MAC address kita.
8. Lalu disable dulu wireless LAN kita. Buka properties wireless LAN dan ubah nilai Local Administration MAC Network, default kosong. Isikan dengan nilai tadi, misalnya 00265E60811C.
p3k

9. Set IP wireless LAN kita dengan IP yang sama yaitu 192.168.182.18 dan isi juga DNS server address. 
p3k

10. Enable kan wireless LAN kamu, dan sekarang kamu connec tanpa menu login.

NB: Untuk mengetahui DNS server address bisa dicek sebelum kita merubah MAC dan IP. Jadi waktu pertama kali kita terhubung ke hotspot, dengan cara mengetik perintah dari command prompt C:\>ipconfig/all

Cara lain yaitu menggunakan Software bernama wzcook, dengan software ini anda akan gampang menjebol jaringan wireless / hotspot sekitar yang anda mau. Tentunya yang telah dipasangi password oleh si pemiliknya.

Adapun cara utk menggunakan wzcook ini, anda hanya membutuhkan sebuah laptop yang menyimpan aplikasi wzcook tsb dan jaringan Wireless tentunya. Anda cukup menjalankan wzcook dan secara otomatis akan mencari jaringan Wireless beserta passwordnya, setelah itu anda tinggal menggunakan access Wireless tersebut dengan gratis. Untuk download Aplikasi wzcook klik disini
0

Cara Mudah Mengetahui Keberadaan Pengguna Facebook Dengan Ip addressnya

Rabu, 05 Juni 2013

Bagaimana cara melacak IP Address seseorang di Facebook? Identitas palsu (fake-ID) di facebook sering dipakai untuk teror, pornografi, bahkan berpolitik. Sangat meresahkan. Persoalannya,, bagaimana “melacak” keberadaan orang yang identitasnya mencurigakan? Saya ingin sampaikan solusinya.
Logika
Terdapat pengaturan  untuk setiap account facebook untuk notifikasi lewat email. Sehingga, anda dapat mengatur agar ada pemberitahuan lewat email jika ada seseorang
mengirimkan pesan ke “inbox” (kotak masuk) facebook. Anda bisa aktifkan “header” email (misalnya di Yahoo) agar bisa menampilkan informasi IP Address “seseorang” tadi. Mengingat informasi IP Address itu masih dalam bentuk encode “Base64? Anda tinggal mengubahnya agar menjadi format IP Address (angka). Setelah ketemu,, lihatlah waktu pengirimannya dan cari lokasi IP Address itu. Selanjutnya,, terserah Anda.
Tutorial
Singkatnya,, inilah tutorial yang bisa Anda jalankan:
  1. Buka account email Anda (misalnya Yahoo!) dan aktifkan pengaturan untuk menayangkan header email,, jadi kalau ada email masuk akan ditampilkan rute pengiriman email secara lengkap. Silakan baca manual penggunaan email. ;)
  2. Aktifkan notifikasi di facebook agar facebook mengirimkan pemberitahuan melalui email.
  3. Cari target yang Anda curigai,, orang yang Anda anggap menggunakan identitas palsu. Atau apa saja motifnya terserah Anda (sebab saya tidak berurusan dengan motif Anda).
  4. Kirimkan pesan kepada target yang Anda curigai tadi,, lakukan rekayasa agar dia memberikan jawaban melalui message!
  5. Setelah dia membalas pesan,, bukalah email Anda. Di situ ada pemberitahuan dari facebook.
    Subject:
    “<Facebook user> sent you a message on Facebook…”, or “<Facebook user> commented on a photo of you on Facebook…”
    X-Facebook: from xxxxyyzz ([OTcuODMuMjEuMjM=]) by www.facebook.com with HTTP (xxxxMail);
    Teks OTcuODMuMjEuMjM= merupakan encode Base64 yang harus Anda convert menjadi plain text (teks biasa). Inilah IP Address dari target yang Anda curigai!
  6. Convert teks “OTcuODMuMjEuMjM=” dengan converter Base64 (cari di Google!) atau gunakan service online (layanan online) yang bertebaran di internet. Catat IP Address yang menjadi target Anda!
  7. Gunakan pelacak IP Address yang bisa menginformasikan lokasi geografis dari sebuah ip Address.
Selanjutnya,, terserah Anda.
Catatan
Jangan menghapus pesan dari “seseorang” yang ingin Anda “balas”. Facebook merancang Kotak Pesan sebagai “percakapan” (conversation). Itu merupakan arsip yang bisa diandalkan untuk meng-kasus seseorang. Jangan matikan notifikasi di account Facebook Anda jika ingin mendapatkan bukti otentik. Kalau Anda sudah memiliki catatan notifikasi dan email dari facebook,, dengan mudah Anda bisa menghajar siapapun yang ingin menteror Anda. Walaupun Anda menyembunyikan email dari informasi profile, memakai bukan-nama-sebenarnya, ataupun informasi palsu,, ingatlah: logika tetaplah logika!!!
Banyak yang merasa aman melakukan teror dari warnet, tetapi, warnet justru paling tidak aman. Banyak “saksi” di sana, aktivitas Anda bisa dimonitor (sebab Anda di ruang publik). Banyak juga yang merasa aman memakai internet pribadi,, lewat ponsel,, dll. ingatlah bahwa account Anda terdaftar ! Melacaknya hanya soal waktu.
Postscript
Lengkapi facebook Anda dengan aplikasi chat logger (untuk mencatat hasil chatting) dan facebook archiver (untuk mengarsip seluruh content facebook Anda ke hardisk) dan jangan hapus pesan di Kotak Masuk maupun email dari facebook. Social networking kadang berubah menjadi social not-working, tetapi jangan pernah mengganggu orang di facebook. Bagi orang-orang yang pernah melakukan teror terhadap kawan-kawan saya di facebook,, ingatlah : mengungkap kejahatan kalian hanyalah soal waktu.
Semoga bermanfaat
8

Cara mengetahui dan membongkar identitas foto dengan JPEGsnoop


Apakah anda pernah mendapatkan foto yang ingin dilihat identitasnya ? Identitas disini adalah sebenarnya siapa pemilik dari foto tersebut. Tentunya foto yang masih dalam bentuk digital. Proses pengidentifikasian foto digital tidak susah jika foto tersebut belum diedit, karena meta tag nya masih sesuai dengan aslinya dan tentunya sangat mudah untuk dilakukan, yaitu dengan klik kanan, kemudian pilih properties, kemudian klik tab summary, dan klik tombol advance, maka kita akan mendapatkan informasi detail mengenai foto tersebut
Atau untuk lebih detailnya lagi kita bisa menggunakan Acdsee untuk mendapatkan informasi yang lebih detail lagi, karena software acdsee ini didesain untuk bisa mengenali identitas foto lebih jauh lagi. Tetapi sayangnya, foto yang sudah pernah diedit tidak akan dengan mudah bisa dikenali identitasnya, baik oleh windows maupun software acdsee ini. Alternatifnya adalah menggunakan software decode image atau foto.
Software yang mempunyai fungsi untuk bisa membaca identitas foto dengan men decode ulang sebuah foto digital adalah JPEGsnoop. Dengan software ini, kita tetap akan bisa melihat identitas sebuah foto walaupun foto tersebut sudah pernah diedit.
Dengan JPEGsnoop ini, anda bisa mendeteksi sebuah foto digital layaknya seorang pakar fotografi atau seperti ahli Telematika terkemuka di Indonesia, yaitu Bapak Roy Suryo yang sering kali muncul di televisi menyampaikan informasi tentang ke-original-an, atau asli tidaknya suatu foto yang beredar di masyarakat, khususnya foto-foto para artis. Dan tidak menutup kemungkinan, Bapak Roy Suryo juga menggunakanJPEGsnoop ini dalam menganalisis foto-foto tersebut. Bisa jadi, bukan ?!
JPEGsnoop merupakan aplikasi gratis yang dapat mendeteksi apakah sebuah foto telah dimanipulasi atau merupakan sebuah foto original.JPEGsnoop dapat mendeteksi berbagai macam setting yang digunakan pada sebuah kamera digital (EXIF metadata, IPTC) dan juga dapat membandingkan sebuah foto dengan banyak parameter variasi kompresi. Parameter ini bervariasi, tergantung kamera atau software yang digunakan.
Aplikasi ini akan melaporkan kamera digital jenis apa yang digunakan atau software apa yang dipakai untuk memanipulasi foto. Hal ini sangat penting untuk menentukan apakah sebuah foto sudah dimanipulasi atau belum.  JPEGsnoop memberikan banyak informasi mengenai sebuah foto, termasuk quantization table matrix (chrominance dan luminance), chroma subsampling, perkiraan kualitas JPEG, setting resolusi JPEG, tabel Huffman, EXIF metadata, Makernotes, histogram RGB dan masih banyak lagi.
Beberapa Tips dalam Menggunakan JPEGsnoop
Tips 1 :
Buka sebuah foto dalam JPEGsnoop untuk menampilkan semua data yang ditemukan secara rinci, informasi, seperti apakah foto telah diedit dan dengan editor apa foto tersebut telah diproses dapat anda temukan di bagian akhir dengan label “Searching Compression Signatures”.
Tips 2 :
JPEGsnoop memiliki sebuah database lengkap berisi berbagai model kamera. Anda pun dapat menambahkan model kamera tertentu yang belum ada pada database-nya. Load sebuah foto yang dibuat dengan kamera tersebut ke dalam program dan pilih “Add Camera/SW to DB”.
Tips 3 :
Program ini pun dapat menganalisis file AVI bila memakai format MPEG. Untuk itu, pilih “File > Open Image” dan ganti “File Type” ke “AVI”. Selanjutnya, klik pada “Tools > Image Search FWD”.
Aplikasi JPEGsnoop ini cukup kecil, kapasitasnya sekitar 1,3 MB dan diantaranya bersifat portable atau bisa langsung digunakan tanpa perlu instalasi lagi, dan bisa dijalankan di semua sistem operasi (OS) : Windows 2000/XP/Vista.
Link download :
Situs resmi : http://www.impulseadventure.com/photo/jpeg-snoop.html
alternatif : http://www.ziddu.com/download/14507648/JPEGsnoop.rar.html
referensi : http://incoherentart.blogspot.com/2010/12/jpegsnoop-aplikasi-pendeteksi-foto.html

Kata kunci terkait dengan postingan :

jpegsnoop, cara menggunakan jpegsnoop, cara mengetahui identitas foto, cara mengetahui detail foto, cara melihat metadata foto, cara melihat detail foto, cara mengetahui kapan foto dibuat, cara mencari identitas seseorang, cara mengetahui tanggal foto dibuat, mencari metadata foto, cara mengetahui informasi foto, cara mengetahui metadata foto, cara mengetahui detail photo, cara cek metadata foto, identitas foto, cara mengetahui pemilik foto, melihat metadata foto, cara mengetahui tanggal foto diambil, mengetahui kapan foto dibuat, cara melacak foto pertama kali dibuat, google gambar cara mencari identitas orang melalui gambar, cara mencari identitas seseorang melalui foto, software untuk mengetahui tanggal pembuatan foto, cara mengetahui identitas seseorang melalui foto, cara mengetahui kapan video dibuat, Cara mencari pemilik foto asli, cara mengetahui properties foto, cara mengetahui tipe kamera dari acdc, cara mengetahui kapan foto diambil, mengetahui informasi photo menggunakan jenis kamera apa, cara melihat data foto, cek pemilik asli foto di facebook, software untuk mengetahui kapan foto itu dibuat, cara melacak pemilik foto, cara mengecek detail foto, Cara melihat program apa yang digunakan pada poto, cara mengetahui identitas orang melalui foto, cara melihat tanggal foto diambil, aplikasi pencari jenis decode, cara pakai jpgsnoop, Aplikasi pelacak identitas dengan foto, Trick melihat jenis kamera yang digunakan, software untuk membaca detail foto, cek foto multimedia di exif, bagaimana mengetahui tanggal pembuatan foto di facebook, cara mencari identitas melalui foto, cari identitas orang lewat foto, cara deteksi photo secara detail, cara deteksi program tidak pernah dipakai, cara mengetahui meta data photo